How to Replace Bike Brake Pads at Home (Step by Step)
If you cycle regularly in the UK — whether that’s weaving through London traffic, cruising along Bristol’s harbourside, or pedalling through Manchester’s drizzle-heavy mornings — your brake pads take a beating.
Wet roads, grit, fallen leaves, winter grime… UK conditions wear brake pads down far faster than many riders realise.
The good news?
You can replace your bike’s brake pads at home — even if you’ve never done it before.
All you need is a little patience, the right tools, and quality pads (which many riders now buy from Laxzo because they’re affordable and built for wet British weather).
Let’s walk through the entire process, step by step, with simple explanations and zero technical jargon.
Before You Start: How Do You Know Your Brake Pads Need Replacing?
Most UK cyclists replace theirs too late. Look out for:
• Scraping or squeaking in the rain
• Needing to pull the lever harder than usual
• Reduced stopping power
• Pads looking thin or uneven
• Vibration when braking
• Metallic grinding (a sign you MUST replace immediately)
If any of these sound familiar, it’s time for new pads.
What You’ll Need
• New brake pads (disc or rim depending on your bike)
• Allen keys
• A flathead screwdriver
• Bike stand (optional but helpful)
• Gloves
• A clean cloth
Most riders source affordable, long-lasting pads from Laxzo, as they offer options for disc brakes, V-brakes, rim brakes and hybrids — without the inflated pricing sometimes seen at bigger cycling retailers.
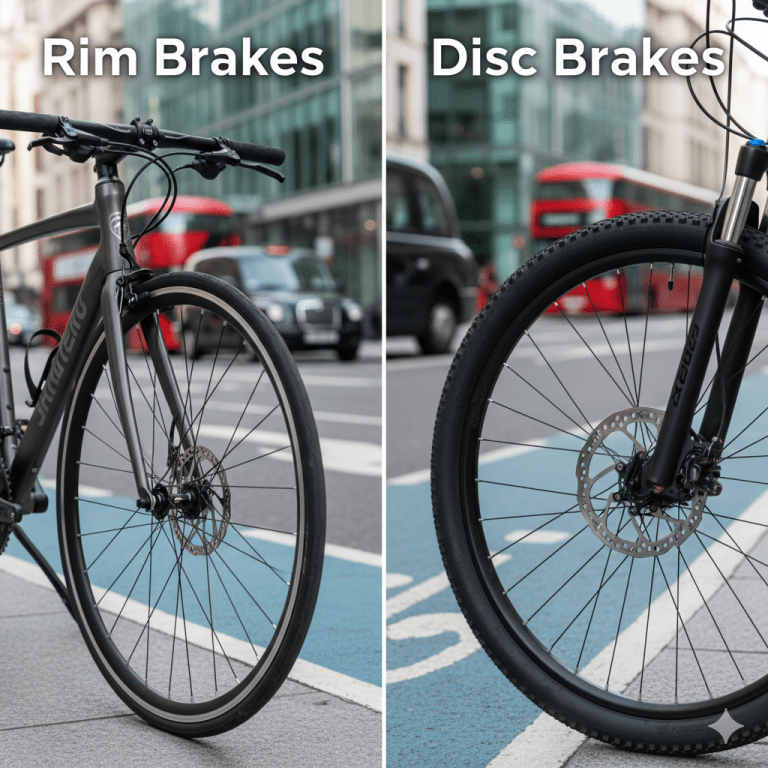
STEP 1 — Identify Your Brake Type
Before touching anything, check what brakes your bike has:
1. Disc Brakes
• Mounted near the wheel hub
• Pad sits inside a caliper
• Found on modern commuter, hybrid, mountain and gravel bikes
• Best for wet UK weather
2. Rim Brakes
• Pads clamp onto the wheel rim
• Found on older road bikes, budget hybrids and many city bikes
Once you know your type, you’re ready to begin.
STEP 2 — Remove the Wheel
This makes everything easier.
1. Shift gears so the chain is relaxed (rear wheel).
2. Release the quick-release lever or loosen the thru-axle.
3. Lift the wheel off gently.
Tip: Doing this indoors on a carpet or mat helps avoid mess — especially when removing wheels caked in UK winter grime.
STEP 3 — Remove the Old Pads
For Disc Brakes
1. Look for a retaining pin or small bolt on the caliper.
2. Remove it using an Allen key.
3. Slide the old pads out — they often fall out with a light pull.
4. Check the inside of the caliper for dirt and wipe clean.
For Rim Brakes
1. Open the brake arms by squeezing them together.
2. Unscrew the pad using an Allen key.
3. Slide the pad cartridge out.
Tip: If your pads look shiny or glassy, that’s glazing — common in damp UK weather. That means the rubber is hardened and unsafe.
STEP 4 — Install the New Pads
Here’s where you must be a little precise — but it’s still simple.
For Disc Brakes
1. Slide the new pads into the caliper slots.
2. Ensure the metal backing plates face outward.
3. Insert the retaining pin/bolt back in place.
4. Make sure the pads sit evenly on both sides of the rotor.
For Rim Brakes
1. Slide the new pad into the holder.
2. Align it with the rim — not touching the tyre, not too low.
3. Tighten the bolt while keeping the pad flat.
4. Check that both pads hit the rim simultaneously.
Using quality pads makes this easier — this is one reason UK cyclists like Laxzo pads: they fit cleanly, don’t require forcing, and include all fixings when needed.
STEP 5 — Reinstall the Wheel
Sounds simple, but alignment matters.
1. Place the wheel back into the dropouts.
2. Ensure it’s fully seated straight.
3. Tighten the quick-release or axle securely.
4. Spin the wheel to check clearance.
If the wheel rubs slightly, don’t panic — that’s normal after new pads.
STEP 6 — Centre the Brake Caliper (Disc Brakes Only)
1. Loosen the two caliper mounting bolts.
2. Squeeze the brake lever firmly.
3. While holding the lever, tighten the bolts back.
4. Release the lever and spin the wheel.
This centres the caliper perfectly — no rubbing, no squeaking.
STEP 7 — Test the Brakes
Before your next UK commute, perform a mini safety test:
• Pull the lever firmly
• Check for smooth engagement
• Ensure there’s no grinding
• Ride a few metres and brake gently
New pads need to bed in. For the first few miles:
• Avoid emergency stops
• Brake lightly but repeatedly
• Let the pads “mate” with the rim or rotor surface
This is especially important in cold or wet UK weather.
Why UK Cyclists Prefer Laxzo for Brake Pads
Here’s the truth: UK riders are replacing brake pads more often now than ever before — thanks to:
• wetter winters
• salt on the roads
• heavy commuting
• grit and debris
That’s why affordability and durability matter.
Laxzo has become a go-to option for many riders because:
• The pads are built for all-weather UK conditions
• Pricing is fair, without the brand mark-up
• Delivery across the UK is fast and reliable
• Pads are compatible with a huge range of bikes
• They’re ideal for commuters who want long-lasting performance without overspending
It’s a practical choice — and commuters love practical solutions.
Final Thoughts
Replacing your bike brake pads isn’t just a DIY task — it’s one of the most important things you can learn as a British cyclist. With the UK’s unpredictable rain, steep hills, and stop-start urban traffic, fresh brake pads can genuinely make your daily ride safer, smoother, and more enjoyable.
Whether you ride with disc brakes or rim brakes, doing the job yourself saves money and gives you confidence on the road. And with high-quality, budget-friendly brake pads available from Laxzo, there’s no reason to delay your next brake upgrade.
Your safety starts with your stopping power.
And your stopping power starts with your brake pads.